DIY Clutch Replacement Cost & Time Estimator
Comparison Summary
Quick Takeaways: The DIY Reality Check
- It is a high-effort job that typically takes a beginner 8 to 16 hours.
- You need specific heavy-duty tools like a transmission jack and a clutch alignment tool.
- The biggest risk isn't the clutch itself, but damaging the flywheel or the input shaft.
- Buying a full clutch kit is always better than replacing individual parts.
Is Your Skill Level a Match for This Job?
Before you dive in, be honest about your mechanical experience. If you've only ever changed your oil or swapped a battery, a clutch replacement is a massive leap. This job requires you to support the weight of the engine and the transmission simultaneously. If a jack slips, you aren't just looking at a broken part; you're looking at a crushed chassis or a serious injury.
A typical DIYer who is comfortable with basic repairs will find this challenging but doable. You'll be dealing with Manual Transmission is a system that uses a driver-operated clutch and a gear stick to control the power delivered from the engine to the wheels systems, which are heavy, greasy, and awkward to maneuver. If you have a driveway with a flat surface and a decent set of sockets, you're halfway there. But if you're working on a steep slope or have no way to safely hoist the car, stop now and call a professional.
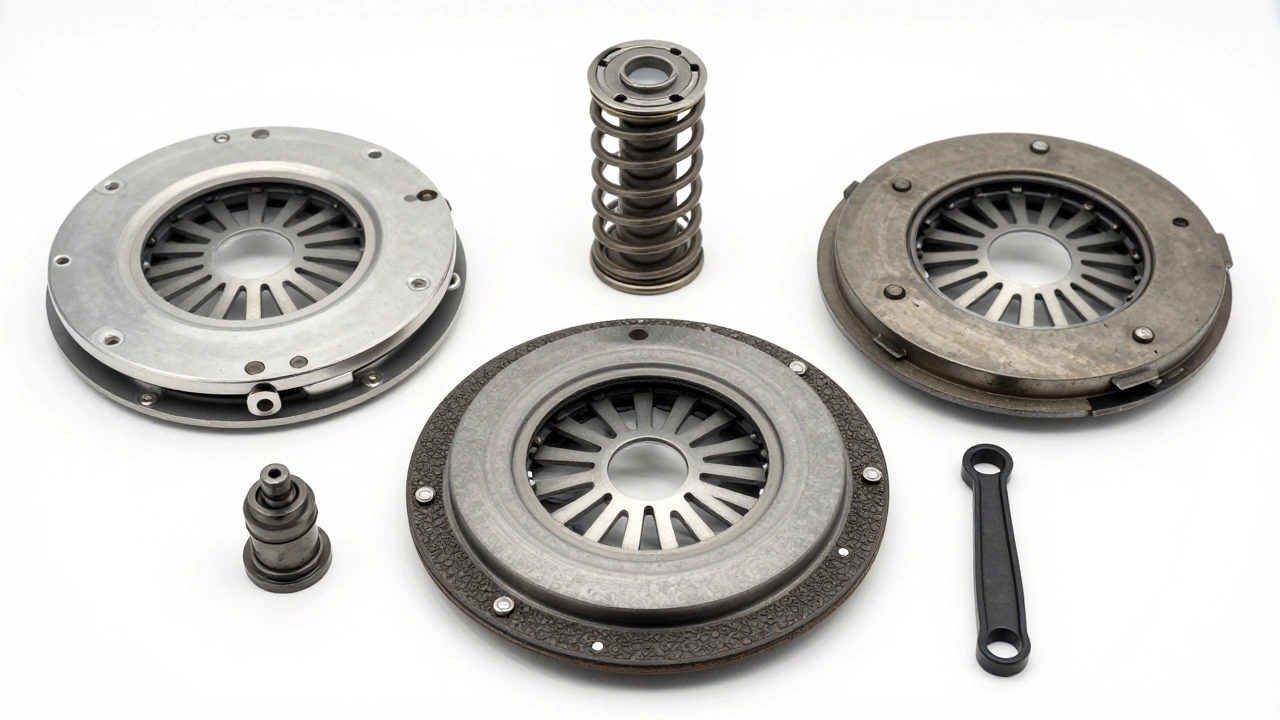
The Anatomy of a Clutch Kit: What You're Actually Replacing
You can't just buy a "clutch." You need a complete kit to ensure everything works in harmony. If you replace the disc but keep an old, worn-out bearing, you'll be ripping the whole thing apart again in three months. A standard Clutch Kit generally consists of three main components that work together to transfer torque from the engine to the gearbox.
First, there's the Clutch Disc is a friction plate that grips the flywheel to transfer engine power to the transmission . This is the part that actually wears down. Then you have the Pressure Plate is a heavy spring-loaded mechanism that clamps the clutch disc against the flywheel . Finally, there's the Release Bearing (or throw-out bearing), which pushes the pressure plate to disengage the engine from the wheels.
| Component | Primary Role | Wear Level | Critical Failure Sign |
|---|---|---|---|
| Clutch Disc | Friction Transfer | High | Slipping during acceleration |
| Pressure Plate | Clamping Force | Medium | Difficulty shifting gears |
| Release Bearing | Disengagement | Medium | Squealing noise when pressing pedal |
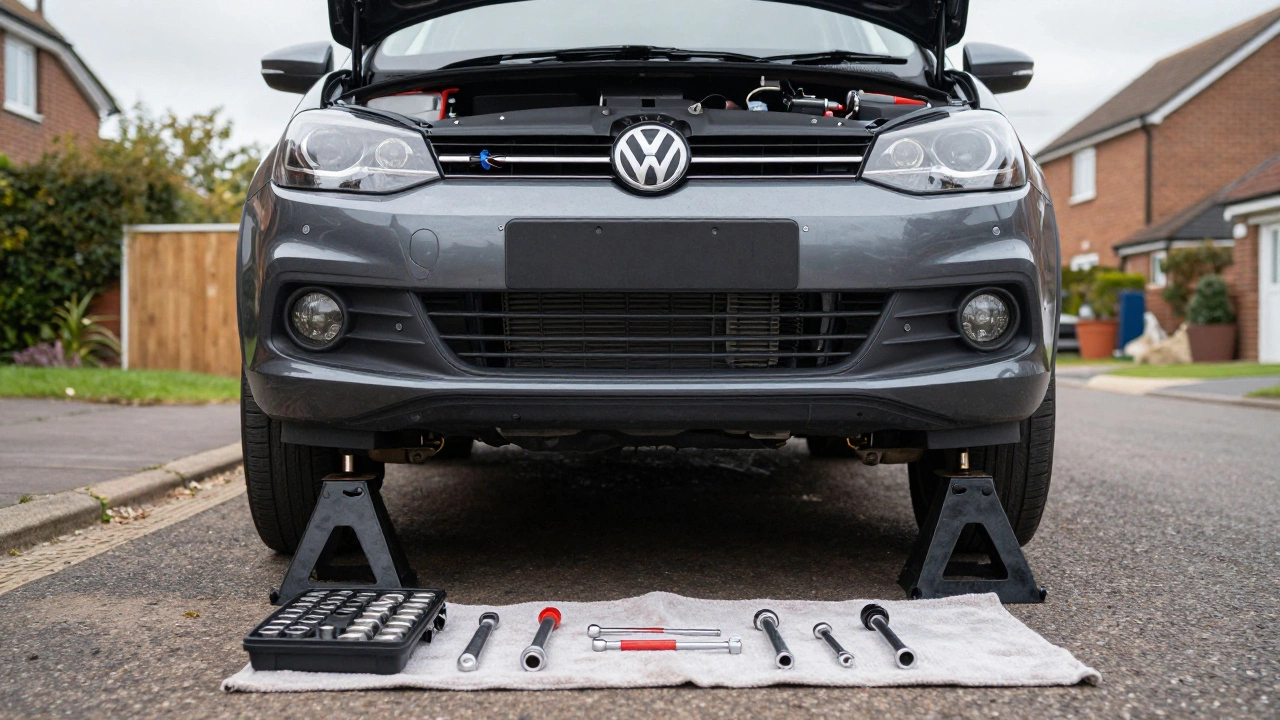
The Tools You Can't Skip
You cannot do this job with a basic household toolkit. If you try to "make do" with a pair of pliers and a screwdriver, you'll strip bolts and leave your car stranded on jack stands for weeks. There are a few specialized tools that are non-negotiable for a successful install.
The most critical is the Clutch Alignment Tool is a plastic or metal pin used to center the clutch disc perfectly before the pressure plate is tightened . If the disc is off by even a few millimeters, the transmission input shaft won't go back in, and you'll be stuck staring at a gap you can't close. You also need a transmission jack-not a floor jack, but a dedicated cradle that holds the gearbox steady while you slide it into place.
Don't forget a good torque wrench. Tightening the pressure plate bolts "by feel" is a recipe for disaster. If one bolt is tighter than the others, the plate can warp, leading to a shuddering clutch or a total failure within a few hundred miles. Check your owner's manual or a service guide for the exact Newton-meters (Nm) required for your specific vehicle model.
Step-by-Step: The General Workflow
While every car is different-some require you to drop the gearbox from the top, others from the bottom-the general logic remains the same. Here is how the process usually unfolds.
- Preparation: Disconnect the battery and drain any fluids that might get in the way. Lift the car securely using axle stands; never trust a hydraulic jack alone.
- Drivetrain Disconnection: Remove the driveshafts (for front-wheel drive) or the propshaft (for rear-wheel drive). You'll also need to unbolt the starter motor and shift linkages.
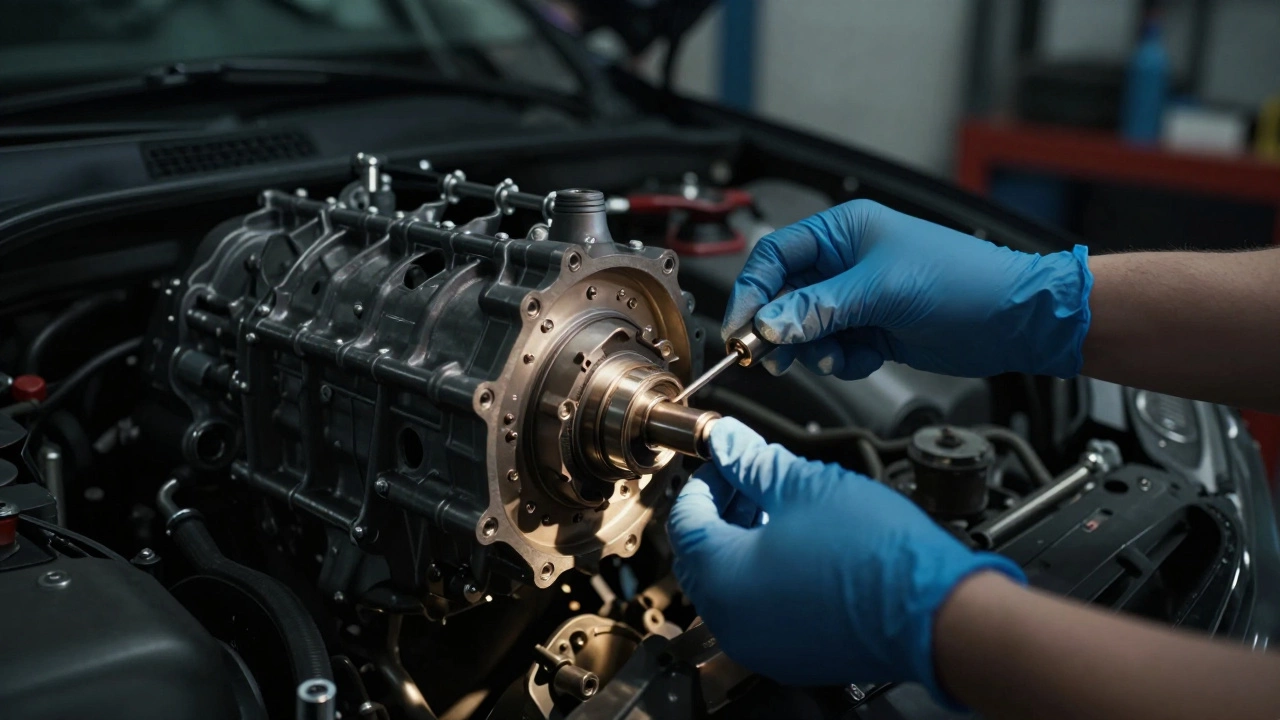
- Dropping the Gearbox: Use your transmission jack to support the Transmission is the gearbox that allows the driver to change gears and control the speed and torque of the vehicle . Slowly slide it back away from the engine and lower it carefully.
- Removing the Old Clutch: Unscrew the pressure plate. The clutch disc will fall out-be ready to catch it. Inspect the Flywheel is a heavy metal disc bolted to the engine's crankshaft that provides rotational inertia and a mating surface for the clutch . If it has deep grooves or "blue spots" from overheating, it needs to be resurfaced or replaced.
- Installing the New Kit: Use the alignment tool to place the new disc. Tighten the pressure plate in a star pattern to ensure even pressure. Replace the release bearing on the input shaft.
- Reassembly: Slide the transmission back in. This is the hardest part-it requires patience and a steady hand to line up the splines. Once bolted, reconnect the linkages and driveshafts.
The Danger Zones: Where DIYers Fail
Most people don't fail at the actual installation; they fail at the details. The biggest mistake is ignoring the flywheel. Many people think, "It looks okay," and bolt the new disc right on top of a glazed or warped flywheel. This is like putting brand new tires on a bent rim; you'll get a vibration that makes the car feel like it's shaking apart.
Another common pitfall is contamination. The friction material on a new clutch disc is incredibly sensitive to grease and oil. If you get a smudge of gear oil or grease from your fingers on the disc, it will slip and smell like burning rubber the moment you drive. Use brake cleaner to wipe down all mating surfaces, and wear nitrile gloves when handling the new disc.
Finally, there's the issue of the Hydraulic Clutch System is a system using fluid and a master/slave cylinder to actuate the clutch instead of a cable . If your car uses hydraulics, you'll need to bleed the system to remove air bubbles. If you don't, the pedal will feel "spongy," or worse, it will stay on the floor, leaving you unable to shift into gear.
Cost Breakdown: DIY vs. Professional
Is the money you save worth the stress? Let's look at the numbers. A mid-range clutch kit for a common hatchback might cost between £150 and £300. A professional garage will likely charge you £400 to £800 for labor on top of the parts.
If you already own the tools, you're saving a significant chunk of change. However, if you have to buy a transmission jack, a torque wrench, and a full socket set, you might spend £200 just on gear before you even buy the clutch kit. When you add the "opportunity cost"-the fact that your car is out of commission for a weekend-the gap narrows. But for those who love the feeling of fixing their own machine, that's part of the reward.
How long does it take to replace a clutch?
For a professional, it might take 4 to 6 hours. For a DIYer, expect 8 to 16 hours. Much of this time is spent struggling with bolts that have been rusted in place for a decade and carefully aligning the gearbox.
Can I just replace the clutch disc and not the whole kit?
It is highly discouraged. The release bearing and pressure plate usually have the same lifespan as the disc. Replacing only the disc often means you'll have to redo the entire job shortly after because the bearing failed or the pressure plate lost its tension.
Do I always need to replace the flywheel?
Not always. If it's a standard solid flywheel and it's not cracked or heavily scored, you can often get it "skimmed" (resurfaced) by a machine shop. However, if you have a Dual Mass Flywheel (DMF), these are prone to internal failure and are often replaced as a precaution.
What happens if I don't use an alignment tool?
The clutch disc will likely be slightly off-center. When you try to push the transmission back into the engine, it will hit the disc instead of sliding over it. You'll spend hours trying to force the gearbox in, which can actually bend the input shaft or damage the new disc.
How can I tell if my clutch is actually slipping?
The classic test is to put the car in a high gear (like 4th) while going slowly (about 30mph) and then floor the accelerator. If the RPMs jump up quickly but the car doesn't accelerate proportionally, the clutch is slipping.
Next Steps and Troubleshooting
If you've decided to go for it, your first step is to find a high-quality service manual for your specific car. Don't rely on a generic YouTube video; every car has its own quirks, like a hidden bolt behind the engine mount or a specific sequence for loosening the pressure plate.
If you get halfway through and realize the gearbox is seized or the bolts are snapped, don't panic. This is where a mobile mechanic can be a lifesaver. They can help you with the "stuck" parts and then let you finish the installation yourself. Just remember: if you feel like you're using too much force on a part, stop. In automotive repair, "brute force" usually ends with a broken part and a very expensive mistake.